WordPress Export/Import

If you are using your WordPress, you can also get an export of your posts, pages, comments, custom fields, categories, and tags.

The WordPress export is great for grabbing the content of your WordPress site so that you can import it into another WordPress host, such as WordPress.com or WordPress.org.

Note: Exports do not include plug-ins, or other site customizations.

Exporting

  1. From the Dashboard navigate to Tools>Export
    The screenshot below shows how to export all of your posts, pages, comments, custom fields, terms, navigation menus, and custom posts. However, you can also export just certain posts, pages, or media. The export page within WordPress
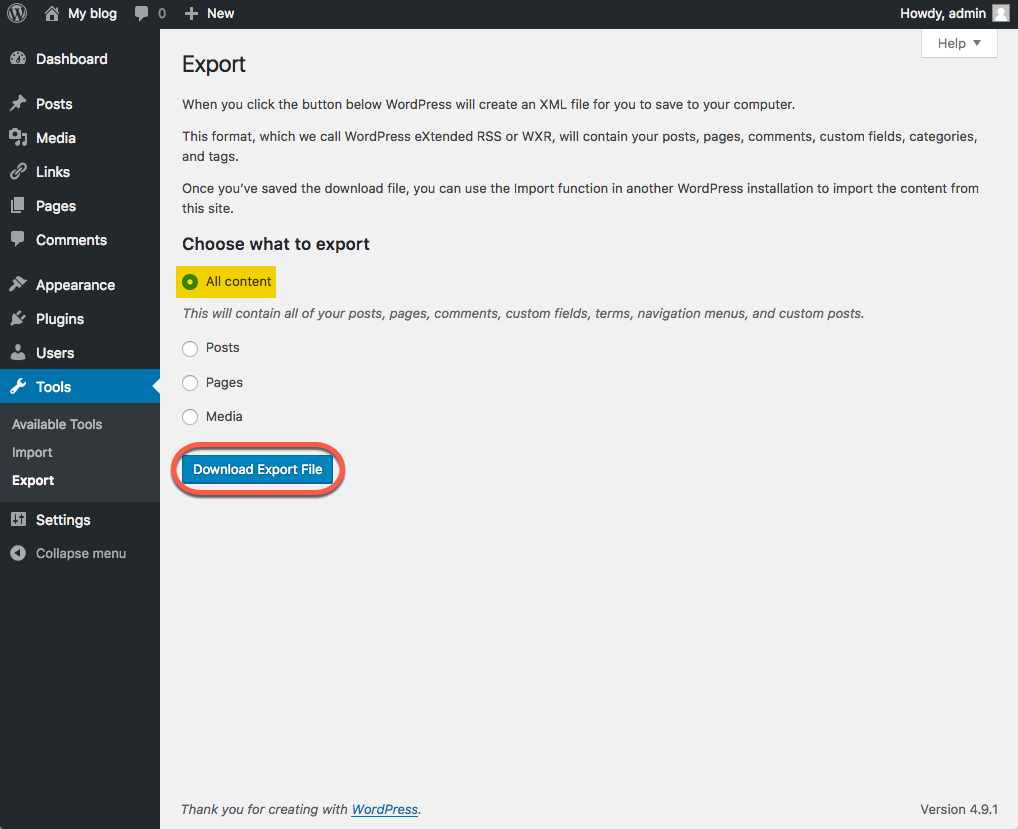
This export process generates an XML file of your blog’s content. WordPress calls this an  eXtended RSS or WXR file.

Note: This will ONLY export your posts, pages, comments, categories, and tags; uploads and images may need to be manually transferred to the new blog. If possible, do not delete your blog until after media files have successfully been imported into the new blog.

Importing

Once you have exported your posts, pages, etc., you can import them into your new WordPress site.

  1. Login to your new WordPress.com or self-hosted WordPress site and go to the Dashboard.  From there navigate to Tools>Import and click on the link to “Run Importer“
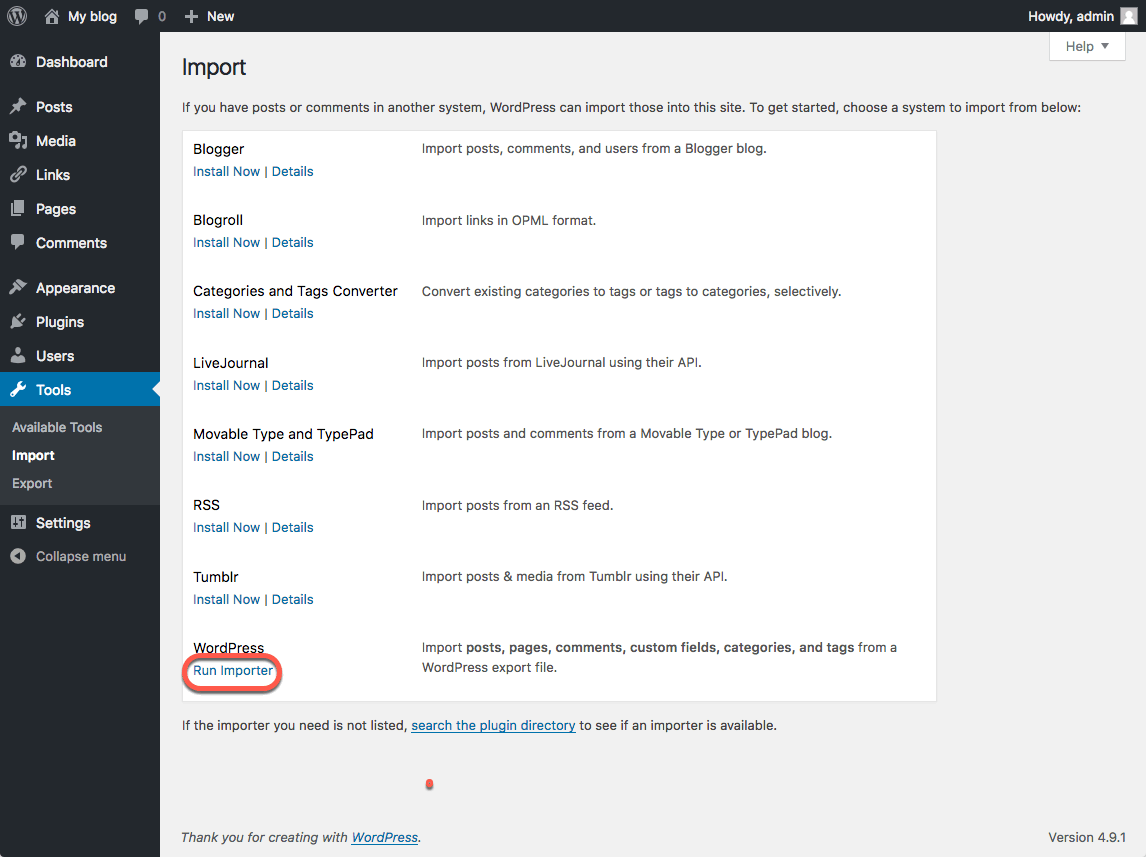
    Screenshot showing where to find the WordPress Importer
  2.  Next you will see a screen that prompts you to upload the WXR (.xml) file you generated through the export process. Browse to your exported WordPress archive and then click the “Upload file and import” button.
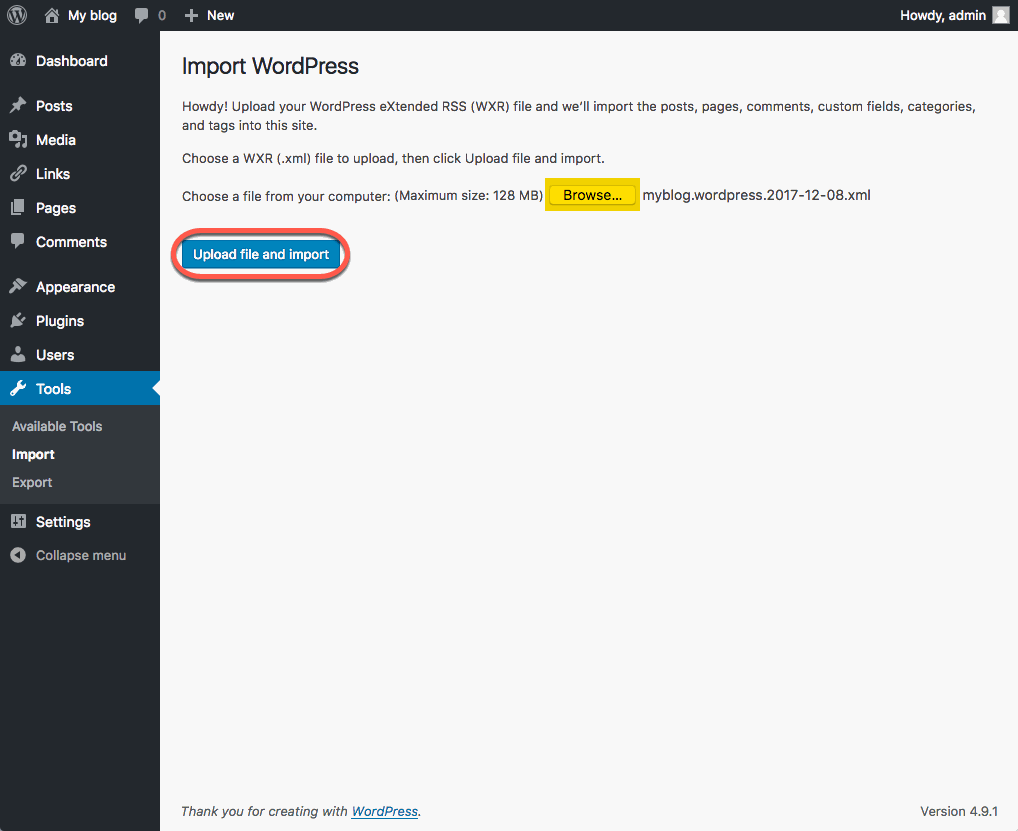
    Upload file and import
  3. Choose and upload your file.  You will then be prompted to assign an author to the posts that you are importing.  You can use this function to assign one author to all posts, or you can manually set the author for each post in the posts menu. Unless you have a space limit, you will also want to select the option to “download and import file attachments” before clicking the “Submit” button.
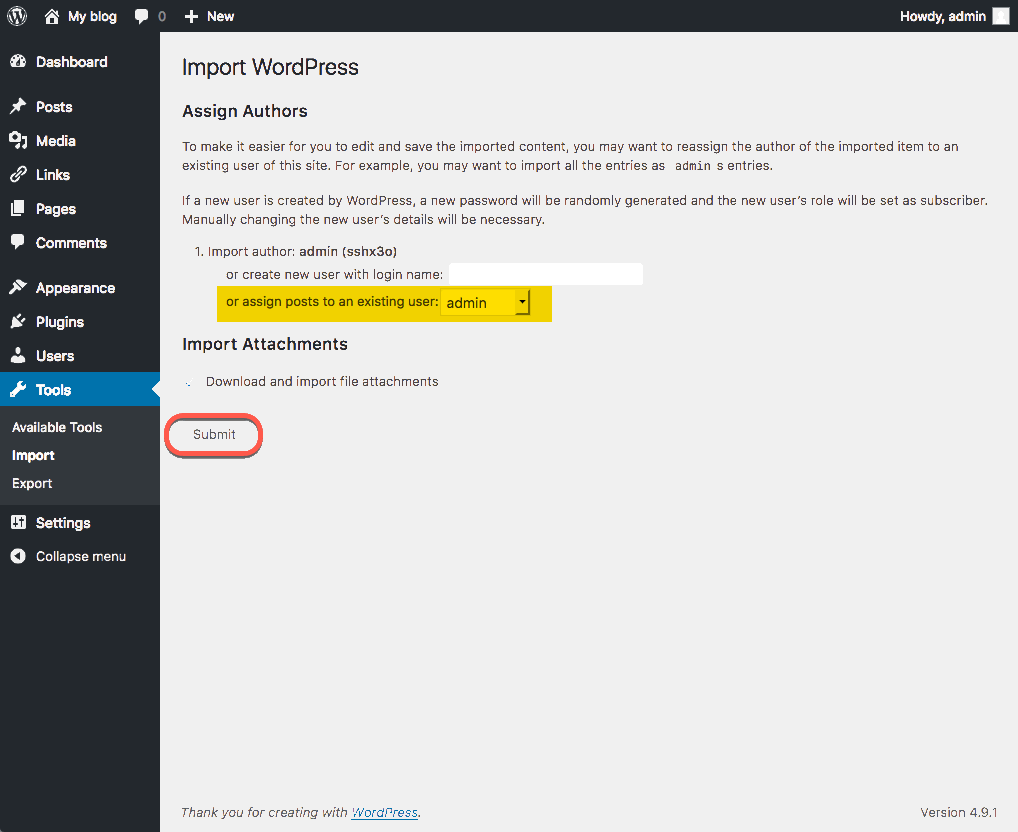
    Select desired import options and click the
  4. When your import is complete, you will see a confirmation screen.
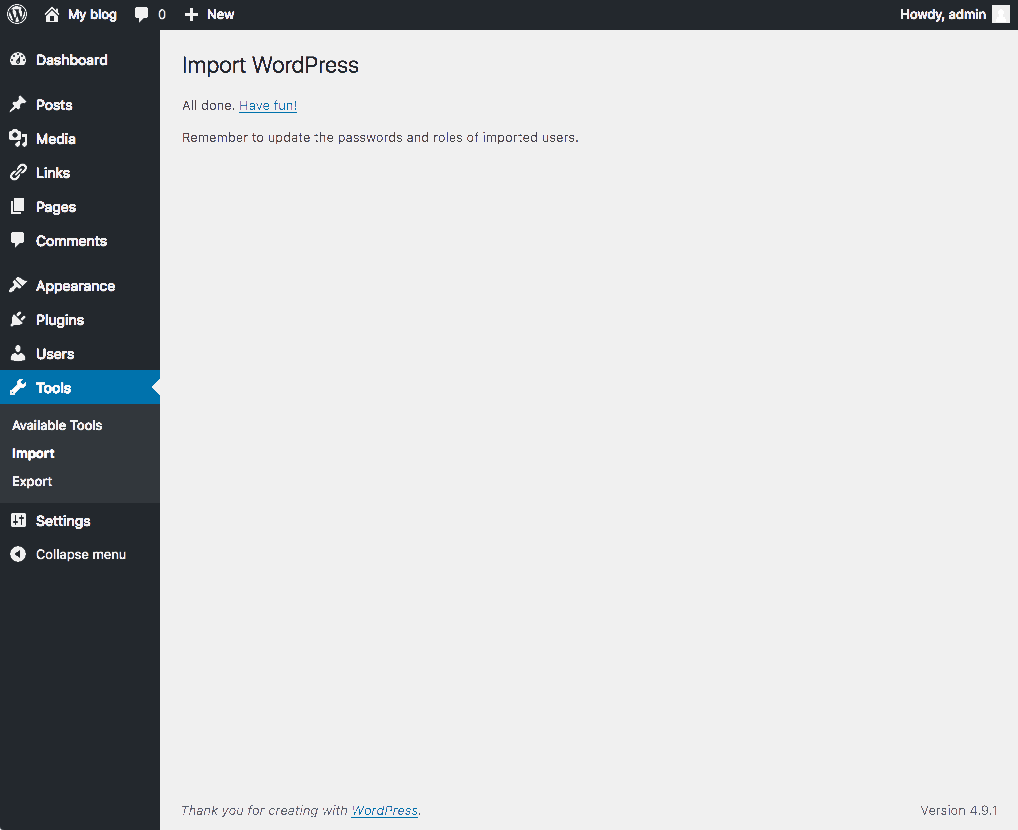
    Confirmation screen

Your exported content is now added to your site. If you had posts on your site prior to importing, those posts are still available.

Because the export did not include themes or plug-ins, you will need to reinstall those separately from the export/import process.
Export your domain

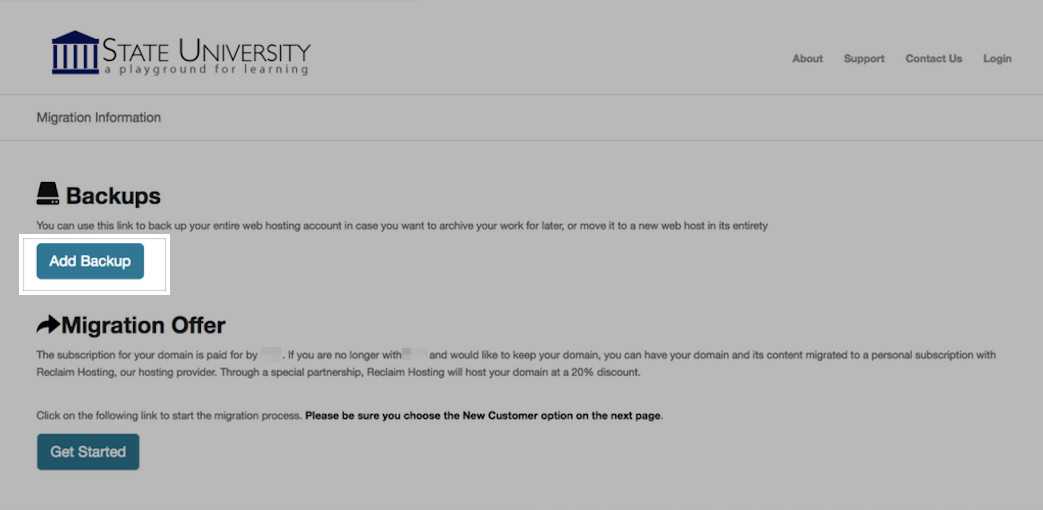
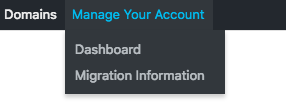
To export your domain, we will create a backup of both the files in your domain and the databases that your domain draws from.  First, click on the ‘Manage Your Account’ menu at the top of your screen and select ‘Migration Information.

  1. To get started you’ll need to login to your control panel (https://packsites.net/dashboard) using your Back to CSU Pueblo username and password.
  2. Once you’re logged in, you’ll see the cPanel interface.  Now click on the Manage Your Account menu at the top of your screen and select Migration Information.
  3. To create a backup of your files and databases, simply click the button labeled Add Backup. The system will take a moment to create a backup. When it is complete, you will see the new backup appear below the button. You can click on this backup to download the file.

File Structures and the File Manager

Web hosting is, at its basic core, files and folders on a computer that is connected to the internet and setup to distribute them. How that computer (typically a server) is set up to do that is covered more in LAMP Environments but this article will explain the idea of the file structure and how it relates to what you view on your domain.

When you signed up for your domain, a web hosting account was created. Although you typically will interact mostly with the web interface to create subdomains, install applications, and other common tasks, you might occasionally also need to work directly with the files in your account. The File Manager in your cPanel is one way to see these files. You can also create an FTP account in cPanel and use an FTP program to interact with these files (FTP stands for File Transfer Protocol, and it’s a way of using a desktop client to transfer files to and from your Web server space).

Let’s take a look at the File Manager built into your cPanel to get a better understanding of the file structure that makes up your website(s).

  1. Login to cPanel with your CSU Pueblo Packsites username and password.
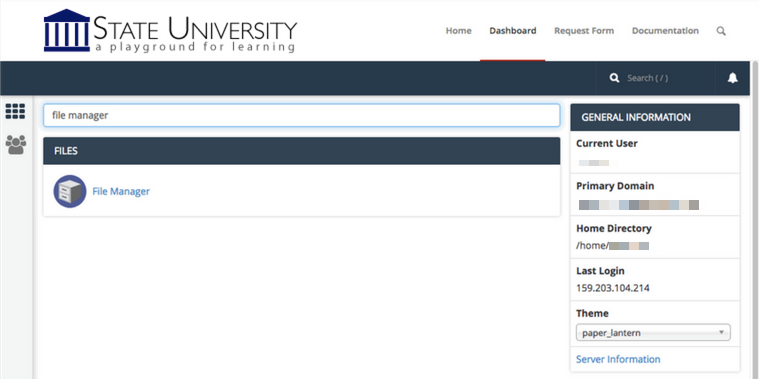
  2. On the homepage of your control panel, you’ll have all the various tools listed. You can easily find the File Manager by using the search tool in the upper righthand corner and typing File Manager. You can also find its icon under Files.
  3. You are now sent to the File Manager and can navigate the folder structure there.

You’ll notice when the File Manager opens up that this looks very much like a folder on your computer. There are a few folders in it as well as files, and you can navigate down into those folders and see what’s inside of them. At the top level of the File Manager, you also have the option of interacting with files and folders you select by moving them around or removing them. There is a larger article all about how to use the file manager at Accessing Your Files through the File Manager so we won’t talk much about how the interface works here. Instead, we’ll cover what those folders and files actually mean and how they relate to what someone sees when they visit your website.

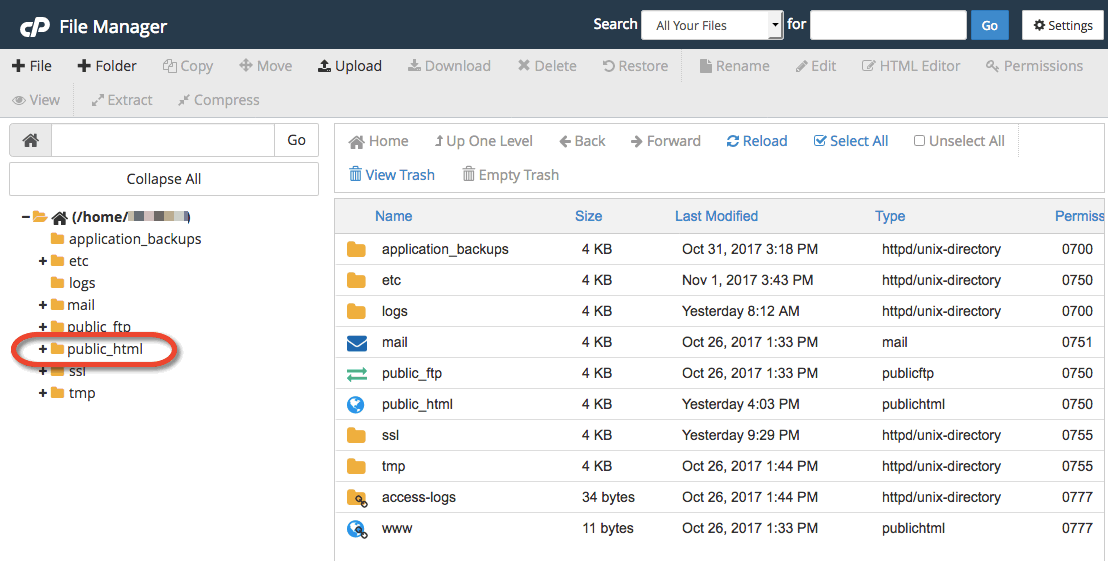
By default, you have a variety of folders at the root of your web space (the first screen you see when you open up the file manager). Some of them are created automatically to store information about the panel and setup of certain sites. These folders are things like access-logs, etc, ssl, and tmp. You can safely ignore most of those folders because they don’t correspond to actual websites. Let’s look at which folders do and how it all works.

Your main domain will correspond with a folder called public_html. Whatever files and folders are inside of this folder are available on that main domain. If you installed WordPress here you’ll likely see a lot of WordPress-related files within it (which were probably helpfully put there by the automated installer). Let’s say we uploaded an image called mypicture.jpg directly into the public_html folder. That image would now be available at yourdomain.com/mypicture.jpg. The slash after your domain implies “this file is inside this folder”. But what if we had a folder inside the public_html folder? How does that appear? This is typically called a subfolder so let’s put a folder in public_html called “images” and put our image, mypicture.jpg, inside of that folder. What would you type in a browser to get to that file now? The location would be mydomain.com/images/mypicture.jpg. So subfolders are also indicated by a forward slash after a domain.

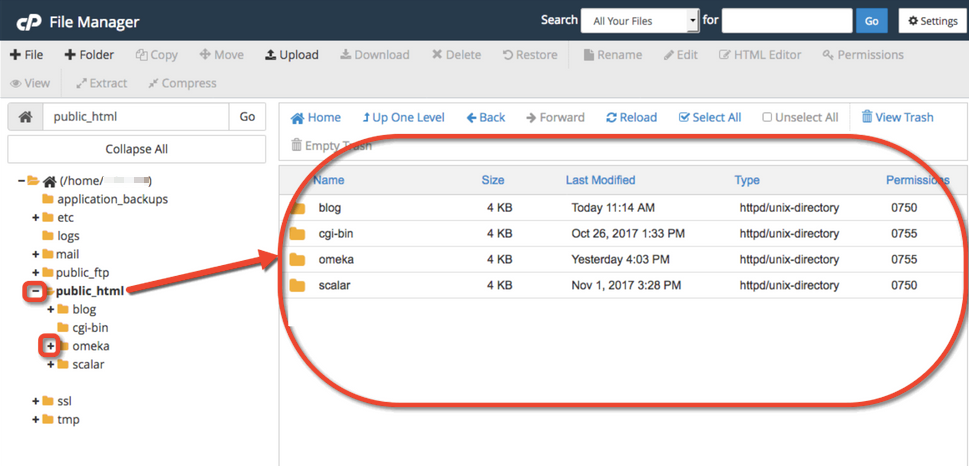
What about subdomains? You can have completely separate sites called subdomains that appear as nameofsubdomain.yourdomain.com. But where are they in the file structure? When you create a subdomain, cPanel will ask you to give the subdomain directory a name. If I had a subdomain called photos.mydomain.com for example, I might want to name the folder “photos” (by default your control panel will call the folder by the name of the subdomain). Folders for subdomains are located inside the public_html folder. So when you go to the File Manager and navigate to public_html, you’ll see folders listed for all of your subdomains and once you navigate inside one of those folders, you’ll see files and folders specifically for that subdomain that appear on the web at that subdomain’s address.

File Manager in cPanel is great to view these files and folders, but it can be limiting if you want to upload an entire folder of information to your website. If you find yourself wanting to do more with the files and folders on your web space you may want to consider using File Transfer Protocol (FTP). FTP will allow you to upload and download files to and from your File Manager (i.e. your website) in bulk. For information on using FTP, click here.

Unlock your domain

This article only if you own your own top-level domain. If you have been using the free subdomain option with packsites.net through Back to CSU Pueblo, this does not apply to you.

Similarly, if you’re migrating your content to Reclaim Hosting, this article does not apply to you.

Transferring a domain you already own is not too much different from registering a new domain, except the transfer process requires an EPP code, or an agreement code between your old registrar and your new registrar that allows the release of your domain. Your new registrar will have information on how to transfer in a domain. When you start that process, you will be prompted to enter your EPP code.

How to find your EPP Code:

  1. To get started you’ll need to login to your control panel (https://packsites.net/dashboard) using your CSU Pueblo Packsites username and password.
  2. Once you’re logged in, you’ll see the cPanel interface.  Now click on the Manage Your Account menu at the top of your screen and select Migration Information.

3. Click the Lock button to unlock your Back to CSU Pueblo account.

4. Click Get Code. Once that’s done, the system will send you an email with your EPP code.

At this stage, here are a few items to note:

  • You’ll receive a series of emails from both your old and new registrars asking you to authorize the transfer. Please act on every email you receive in a timely fashion– even if the emails look like duplicates.
  • If you do not authorize the transfer in a timely fashion, the domain transfer will expire and you will need to start over.
  • The domain must be older than 60 days.
  • The domain must have no other transfers in the last 60 days.
  • The domain transfer process can take up to a week, depending on how fast your registrars work.
  • Once the domain transfer completes, you’ll receive a notification.

Accessing Your Files through the File Manager

Your Back to CSU Pueblo cPanel includes a File Manager that allows you to interact directly with the files stored in your web hosting account. This can be useful if you want to upload software that cannot be automatically installed via the Web Applications section of your cPanel, if you need to change the name or permissions of a file or group or files, or if you want to edit a plain text file. To access your files via the File Manager, use these steps:

  1. Login to packsites.net with your CSU Pueblo Packsites username and password.
  2. Once logged in, you’ll be on the homepage of your cPanel. The easiest way to navigate your cPanel is by utilizing the search bar in the top right panel. Search File Manager. When you press enter, you will be automatically redirected to the File Manager.  You can also find the File Manager icon under the Files section.
  3. On the left side of the “File Manager” window, you’ll see a navigation menu containing the file structure of your web hosting account. More information about the contents of these files and folders can be found in the File Structures and the File Manager documentation article.
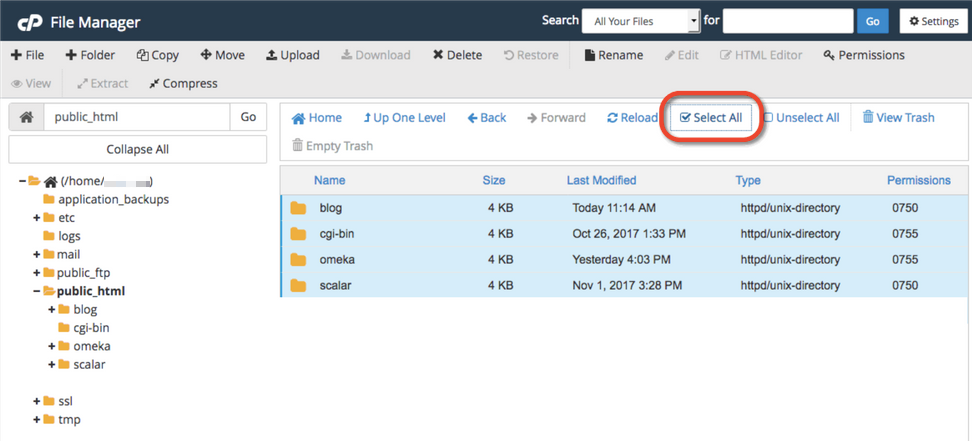
  4. In the navigation menu, choose the public_html directory. This will take you directly to the folder that contains the files associated with your website(s). You’ll notice your current location (the public_html folder) is bolded and highlighted in this menu. Click the [+] (expand) icon next to a folder to see what subfolders it contains, or click on the name of the folder to view all of its contents in the file browser on the right side of the page. You can also navigate through the folders in your account by double-clicking on them in the menu on the left side of your file manager.
  5. To select an item, click once on its icon in the file browser. You can also use the “Select All” button above the file browser, or your computer’s keyboard shortcuts (Shift, Command, Control, etc), to select multiple items from this list.
  6. Depending on what you have selected, different options will be available to you in the action menu across the top of your file manager. For example, if you have selected a folder, you can rename it or Change Permissions on it.
    screen shot of file manager tools
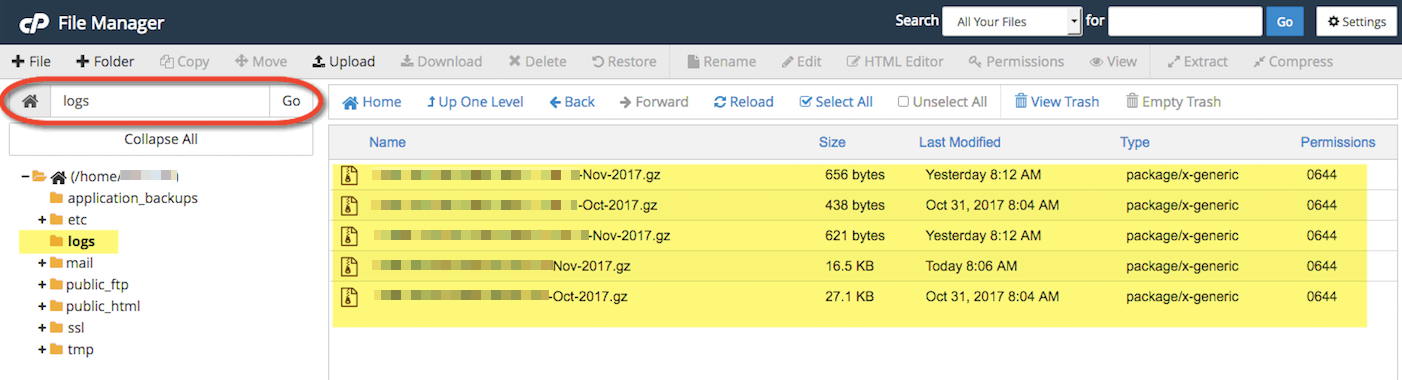
  7. If you know exactly what location you want to skip to within your web hosting account, you can type it into the box directly above the navigation menu and click Go.
  8. Alternatively, if you know the exact name of the file or folder you are looking for, but not its location, you can use the Search box to find it.screen shot to find file by name

Migrate to Reclaim Hosting

Step One: Signing up for an Account

The first step will be to sign up for an account at Reclaim Hosting. This link will take you directly to their Student/Individual Hosting plan option.

– If you already have a Top-Level domain (i.e. yourdomain.com) choose the I will use my existing domain and update my nameservers option.

– If your current website content exists on a subdomain (i.e. yourdomain.packsites.net), select the Register a New Domain or the Use a subdomain from Reclaim Hosting option.

– Enter a new top-level domain name if applicable.

– Complete the sign-up process/pay invoice.

Complete the sign-up process/pay invoice.

Step Two: Let Reclaim Hosting Know

Send a support request to support@reclaimhosting.com with the following message:

Hello Reclaim Hosting Support,
I am graduating from (your school) and I would like to migrate my account, (your domain), to Reclaim Hosting. Please let me know if you need anything else from me.
Best,
(Your Name)

A member of Reclaim Hosting support will respond & help you get your account migrated ASAP.

Omeka

Omeka is an open-source web application that can be used to create and display online digital collections. Developed by programmers at George Mason University, Omeka was designed to be user-friendly, both during installation and setup and during daily usage.

You can learn how to use this application in the official Omeka Support Documentation. This support guide will help you get started and begin creating your Omeka site.

Installing Applications with Installatron

Installatron is a script installer that allows you to quickly and easily install Web applications to on the Web space. By default, when you use Installatron, the application you add will be automatically upgraded whenever a new version is available (and a backup will be kept, just in case).

Installing Applications Using Installatron

  1. To get started you’ll need to login to your control panel by going to https://packsites.net/dashboard/.
  2. Here you’ll log in with your CSU Pueblo Packsites username and password.
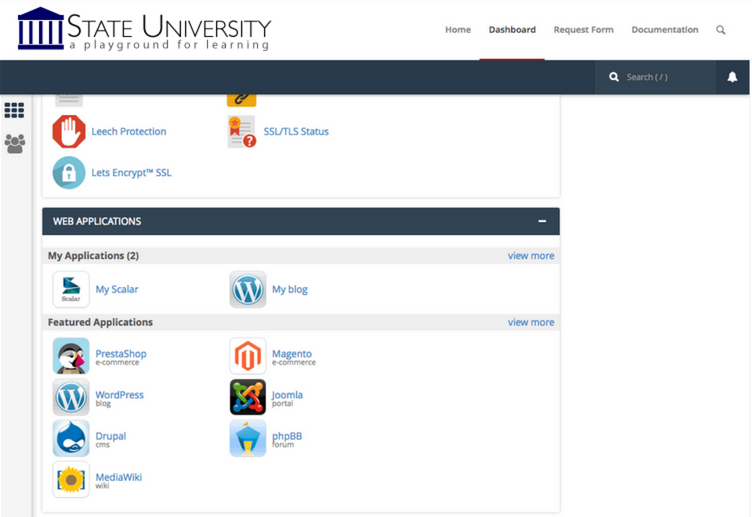
  3. Once logged in you’ll be on the homepage of your control panel (cPanel). You will need to scroll down until you see a section of your cPanel labeled Web Applications. Within this section, you will see a link to the Installatron which you should click. Or, you can type “installatron” (without quotes) into the search bar.  When you press enter you will automatically be redirected to the Installatron page.
  4. A listing of all of the applications you can install by default in Installatron will appear. Navigate to the one you want to install, and click the icon.
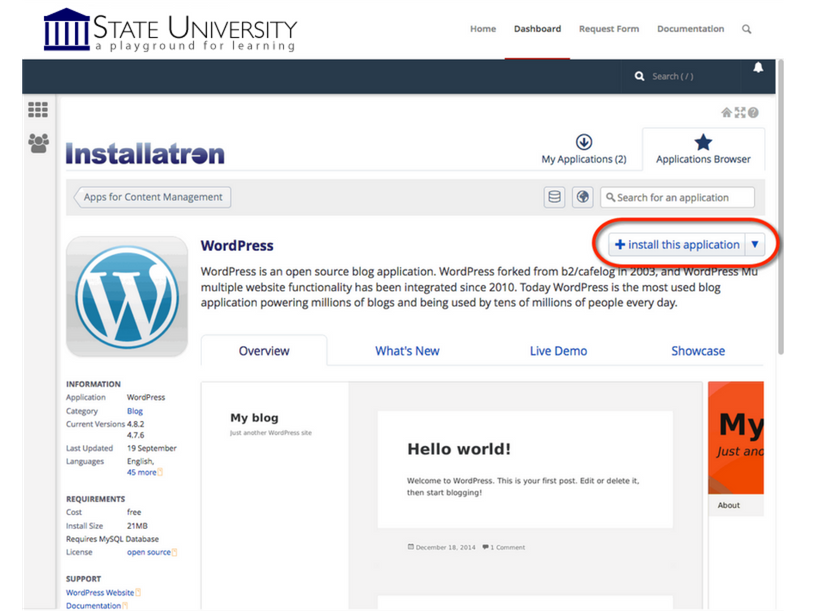
  5. After clicking the icon, a page will appear with information about the application, links to resources, and a link to install it.
  6. Click Install this application when you are ready.
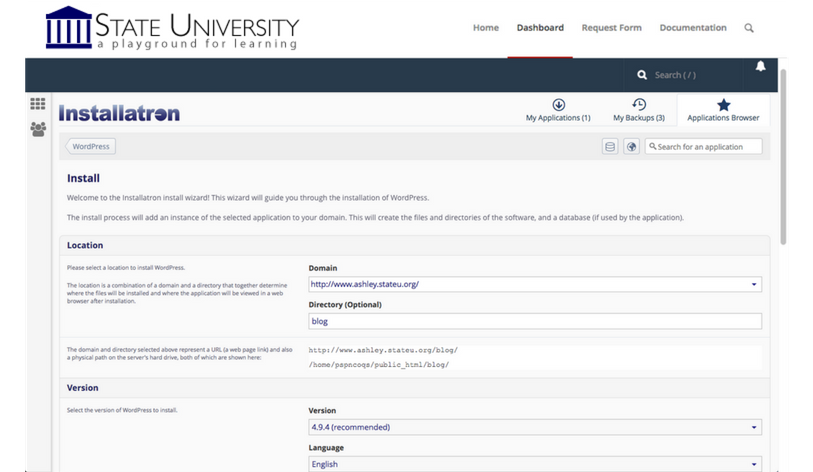
  7. A page will appear with a number of settings you can choose/change. The image below shows these settings; here is a rundown of them:
    • Location: You’ll need to choose where to install your new application. You can install it at the root of your domain or in a subdomain (which you need to set up first). In addition, you can place your application in a folder (in either your root domain or a subdomain)
    • Version Information: You can choose a version of the application. Generally, we recommend choosing the default version. It is likely to be the most recent, stable release.
    • Updates & Database Management: By default, the system is set up to automatically upgrade (and create backups upon upgrading) all applications. In addition, by default, the database will be set up for you automatically. We recommend NOT changing these options.
    • Username/Password: An username/password will be automatically generated for you. You can choose to change this if you like.
    • Click Install: After installation, you’ll be taken back to the main Installatron page, with details about the application you just installed. At any time you can come back here to review the application details, back it up manually, or uninstall it.

To get to your new site, you can click the “website” link. What’s more, with certain applications you can use this space to log in to the admin area.

In addition, you’ll have received an email with your username/password and a link to your new site.